MSA 구현하기(2) - 서버 구성
Skala 과정에서 마이크로 서비스 아키텍처 구조에 대해 새롭게 알게 되었습니다.
배운 것을 실제로 구현해보기 위해 이 여정을 시작하기로 했습니다.
처음 글부터 보러가기
본격적으로 MSA를 구현하기 위해 필요한 라이브러리들을 추가하여 서버를 띄워보겠습니다.
Eureka Server 구성하기
라이브러리 추가
1
2
3
4
5
6
7
8
9
10
11
12
13
<dependency>
  <groupId>org.springframework.boot</groupId>
  <artifactId>spring-boot-starter-web</artifactId>
</dependency>
<dependency>
  <groupId>org.springframework.cloud</groupId>
  <artifactId>spring-cloud-starter-netflix-eureka-server</artifactId>
</dependency>
<dependency>
  <groupId>org.projectlombok</groupId>
  <artifactId>lombok</artifactId>
  <optional>true</optional>
</dependency>
Spring boot web, Eureka Server, Lombok을 추가해주었습니다.
사용할 라이브러리에 맞게 pom.xml 파일을 구성해주시면 됩니다.
Maven에서 Lombok 라이브러리를 사용할 때 버전을 명시해주지 않으면 라이브러리가 제대로 동작하지 않는 오류가 있는 것 같습니다. 혹시 저와 같은 오류(어노테이션 인식 불가)를 만나셨다면 여기처럼 버전을 추가해보세요!
yaml 설정
1
2
3
4
5
6
7
8
9
10
11
12
# 해당 Application Port 를 8761 로 설정
server:
  port: 8761

eureka:
  client:
    register-with-eureka: false # eureka 서버에 등록하지 않기 위한 설정
    fetch-registry: false
  server:
    enable-self-preservation: false
    response-cache-update-interval-ms: 5000 # 5초마다 업데이트
    eviction-interval-timer-in-ms: 10000
Eureka 서버의 기본 포트는 8761으로 지정되어 있지만, 확실하게 하기 위해서 포트를 지정해주었습니다.
Eureka 서버 자기 자신은 서버에 등록되지 않게 설정해두었습니다.
Main Application.java 어노테이션 설정하기
1
2
3
4
5
6
7
8
9
10

@EnableEurekaServer
@SpringBootApplication
public class EurekaApplication {

	public static void main(String[] args) {
		SpringApplication.run(EurekaApplication.class, args);
	}

}
@EnableEurekaServer를 이용해 Eureka 서버임을 명시해줍니다.
API Gateway 구성하기
라이브러리 추가
1
2
3
4
5
6
7
8
9
10
11
12
13
14
<dependency>
  <groupId>org.springframework.cloud</groupId>
  <artifactId>spring-cloud-starter-gateway</artifactId>
</dependency>
<dependency>
  <groupId>org.projectlombok</groupId>
  <artifactId>lombok</artifactId>
  <version>1.18.36</version>
  <optional>true</optional>
</dependency>
<dependency>
  <groupId>org.springframework.cloud</groupId>
  <artifactId>spring-cloud-starter-netflix-eureka-client</artifactId>
</dependency>
API Gateway 서버도 Eureka에 등록되어야 하기 때문에 Eureka Client 라이브러리를 등록해주고, 가장 증요한 Spring Cloud Gateway도 추가해줍니다.
yaml 구성
1
2
3
4
5
6
7
8
9
10
11
12
13
14
15
16
17
18
19
20
21
22
23
24
25
26
27
28
29
30
31
32
33
34
35
36
37
38
39
40
41
42
43
44
server:
  port: 19901

spring:
  main:
    web-application-type: reactive
  cloud:
    gateway:
      globalcors:
        corsConfigurations:
          "[/**]":
            allowedOrigins: "*"
            allowedMethods: "*"
            allowedHeaders: "*"
      discovery:
        locator:
          enabled: true # Eureka에서 자동으로 서비스 찾기
          lower-case-service-id: true # 소문자를 자동으로 대문자로 변환 해주는 설정
      routes:
        - id: user-service
          uri: lb://user-service # 이렇게 해도 되고, 대문자로 해도 됩니다!
          predicates:
            - Header=Service-Type, user
          filters:
            - StripPrefix=0

        - id: order-service
          uri: lb://ORDER-SERVICE
          predicates:
            - Header=Service-Type, order
          filters:
            - StripPrefix=0

        - id: item-service
          uri: lb://ITEM-SERVICE
          predicates:
            - Header=Service-Type, item
          filters:
            - StripPrefix=0

eureka:
  client:
    service-url:
      defaultZone: http://localhost:8761/eureka/ # Eureka 서버의 URL을 지정
지금 당장은 GraphQL로 각 서버가 동작 중이니, localhost:19901/graphql 로 POST 요청을 보냈을 때, Header 설정만 잘 해주면 바로 실행이 가능하도록 spring.cloud.gateway.routes.filters 를 StripPrefix=0 로 설정해주어 url이 그대로 유지되도록 설정합니다.
Main Application.java 설정하기
1
2
3
4
5
6
7
8
9
@SpringBootApplication
@EnableDiscoveryClient
public class ApiGatewayApplication {

	public static void main(String[] args) {
		SpringApplication.run(BffApplication.class, args);
	}

}
@EnableDiscoveryClent 어노테이션을 붙여서 Eureka에 클라이언트로 등록되도록 설정합니다.
Micro Service Server 구성하기
저는 User, Order, Item 서버를 만들 예정이고 모두 같은 라이브러리를 추가하였습니다.
라이브러리 추가
1
2
3
4
5
6
7
8
9
10
11
12
13
14
15
16
17
18
19
20
21
22
23
24
25
26
27
28
29
30
31
32
33
34
35
36
<dependency>
    <groupId>org.springframework.boot</groupId>
    <artifactId>spring-boot-starter-data-jpa</artifactId>
</dependency>
<dependency>
    <groupId>org.springframework.boot</groupId>
    <artifactId>spring-boot-starter-graphql</artifactId>
</dependency>
<dependency>
    <groupId>org.springframework.boot</groupId>
    <artifactId>spring-boot-starter-security</artifactId>
</dependency>
<dependency>
    <groupId>org.springframework.boot</groupId>
    <artifactId>spring-boot-starter-web</artifactId>
</dependency>
<dependency>
    <groupId>org.springframework.cloud</groupId>
    <artifactId>spring-cloud-starter-netflix-eureka-client</artifactId>
</dependency>
<dependency>
    <groupId>org.springframework.kafka</groupId>
    <artifactId>spring-kafka</artifactId>
</dependency>

<dependency>
    <groupId>org.mariadb.jdbc</groupId>
    <artifactId>mariadb-java-client</artifactId>
    <scope>runtime</scope>
</dependency>
<dependency>
    <groupId>org.projectlombok</groupId>
    <artifactId>lombok</artifactId>
    <version>1.18.36</version>
    <optional>true</optional>
</dependency>
Eureka Client, MariaDB JDBC, Spring Security, Kafka, GraphQL(임시로 사용합니다!), Lombok을 추가하였습니다.
yaml 설정
1
2
3
4
5
6
7
8
9
10
11
12
13
14
15
16
17
18
19
20
21
22
23
24
25
26
27
28
29
30
31
32
33
34
35
36
37
38
39
40
41
42
43
server:
  port:
    # 서버 별로 포트를 다르게 설정해두어야 합니다.
    # 저는 (8081, 8082, 8083) 으로 설정해두었습니다.

# Eureka 서버에 클라이언트로 등록되기 위한 설정입니다.
eureka:
  client:
    register-with-eureka: true
    fetch-registry: true
    registry-fetch-interval-seconds: 5000 # 5초마다 한 번씩 재등록하기 (Health Check)
    disable-delta: true
    service-url:
      defaultZone: http://localhost:8761/eureka # Eureka Server URI 정보를 설정

spring:
  kafka:
    # Kafka 서버를 등록한 포트를 연결해주어야 합니다.
    bootstrap-servers: localhost:10000,localhost:10001,localhost:10002
    # 메시지를 보내는 서버에 작성되어야 합니다.
    producer:
      key-serializer: org.apache.kafka.common.serialization.StringSerializer
      value-serializer: org.apache.kafka.common.serialization.StringSerializer
    # 메시지를 받는 서버에 작성되어야 합니다.
    consumer:
      group-id: error-handler-group # Group Id를 지정할 수 있습니다. Config 파일에서 다시 지정해줄 것이지만 혹시 몰라서 설정..해두었습니다.
      auto-offset-reset: earliest
    template:
      default-topic: error-messages

  # DB 관련 설정입니다. 완벽한(?) MSA 구현을 위해 각 서버 별로 DB를 분리하여 설정해주세요!
  datasource:
    url: # DB 주소를 입력해주세요 (Ex: jdbc:mariadb://localhost:3306/{DB 명})
    username: # 역할 이름 (Ex: root)
    password: # 비밀번호
    driver-class-name: org.mariadb.jdbc.Driver

  # MSA와 관련은 없지만 database-platform을 설정해주지 않으면 DB 저장이 정상적으로 동작하지 않습니다.
  jpa:
    database-platform: org.hibernate.dialect.MariaDBDialect
    hibernate:
      ddl-auto: update
    show-sql: true
서버를 여러개 띄우는 것이다 보니 포트를 따로 설정해두지 않으면 충돌이 일어날 가능성이 있습니다. 따라서 서버 별로 포트를 다르게 설정해두었습니다.
Kafka Consumer의 경우 Group 별로 Producer가 메시지를 보내기 때문에 모든 서버가 메시지를 받게 하고 싶다면, 모든 서버에 각자 다른 Group Id를 등록하면 됩니다.
Consumer의 경우 Partition에 따라서도 메시지를 받을 서버가 달라지게 됩니다.
사용자가 따로 설정해주지 않는 경우, 같은 그룹이더라도 다른 partition에 존재할 수 있어모든 Consumer가 메시지를 받지 못하는 문제가 있었기에, 저는 서버마다 각자 다른 Group Id를 등록해주었습니다.
추가 설명
Kafka에 토픽을 등록할 때 설정하는 Replication Factor의 개수를 따로 알맞게 설정해주어야 합니다! 서버가 얼마나 많아질지 몰라서 일단 Group Id를 다르게 하는 것으로 해결했습니다,,
마치며
아마 Kafka나 DB 관련 설정을 모두 끝내고 이 글을 따라오셨다면 총 5개의 서버를 로컬(localhost:8761)에서 실행했을 때 다음과 같은 화면을 확인하실 수 있을 것입니다. 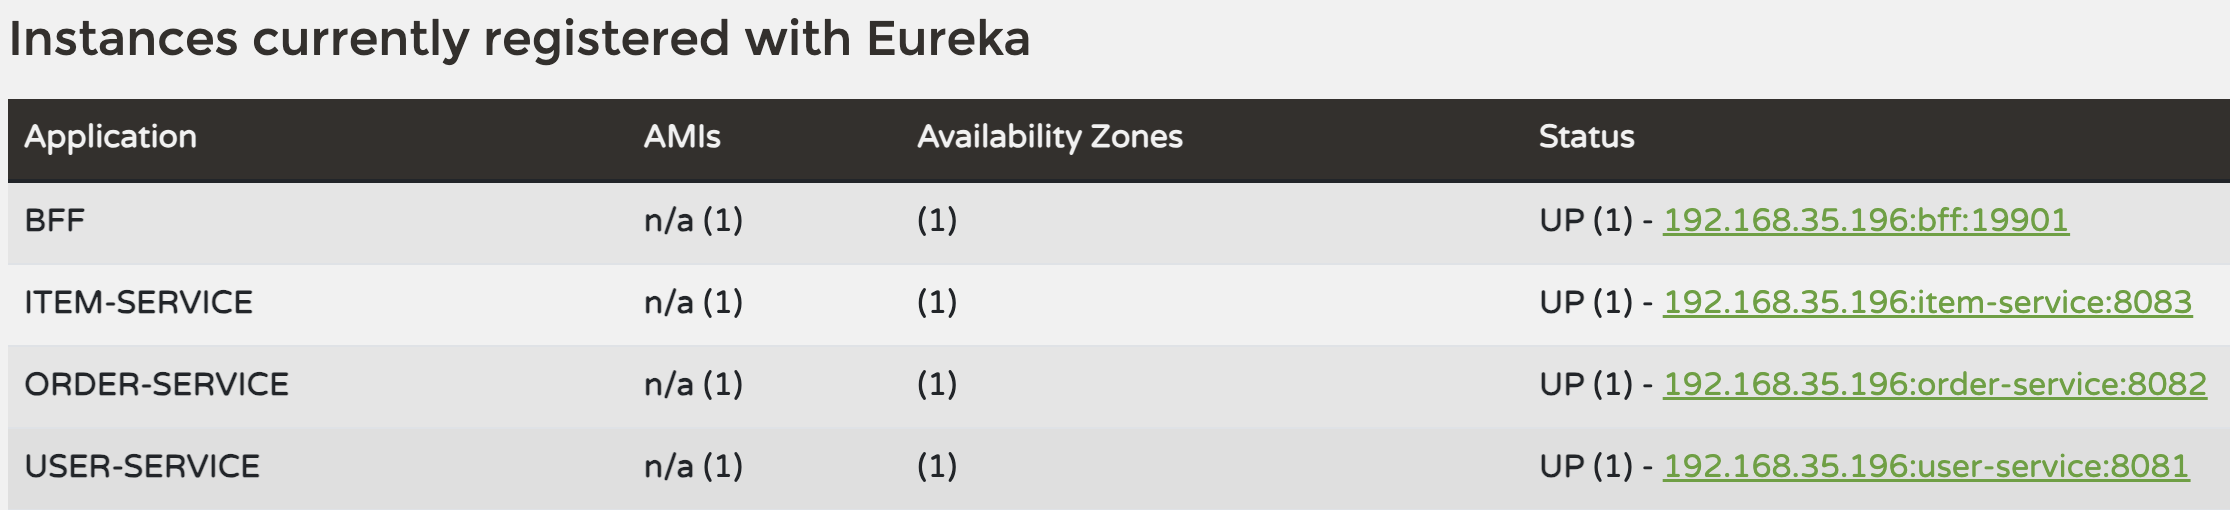
다음은 Kafka 설정 글에서 봐용..~
참고 링크